The ability to import attendees into an event is a commonly used feature of the RSVP Pro plugin. To make the import process as flexible as possible, we created a two-step process the first is where you upload the file, and in the second step, you map the columns in your file to attendee fields. This how-to talks about how this ability works, the features and common questions.
File Type and Format
The following file formats are allowed: Excel (xls or xlsx), CSV and ODS. The import process assumes the first row in the import file is a header row that labels each column. This row will not be imported into the event, but it will be used on the second step of the import process to map columns in the file to attendee fields.
How to Import Attendees
The import process is a two-step process. The goal of this process is to make it as flexible as possible. To import attendees first go to the event listing area and click on “import attendees” under an event.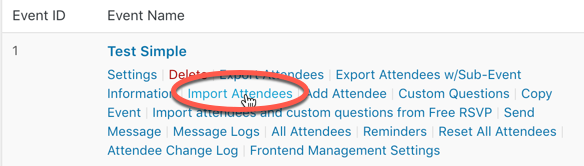
The first step of the import process looks like: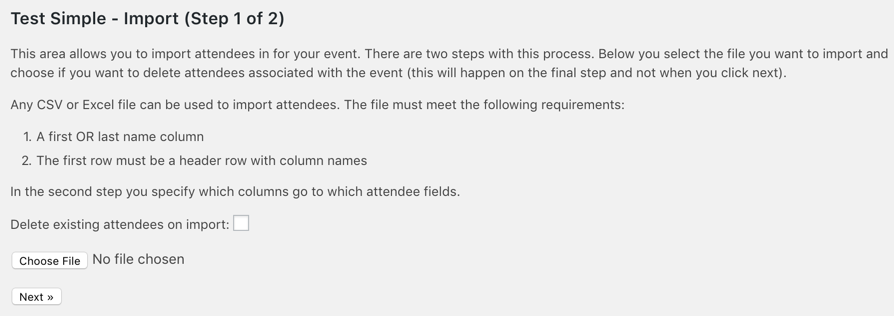
Here you select the file you wish to import. You can also check “delete existing attendees on import.” However, attendees will not be deleted until you finish step two. After you have selected the file and are ready to map your file to attendee fields hit the “next” button. This will take you to a screen that looks like: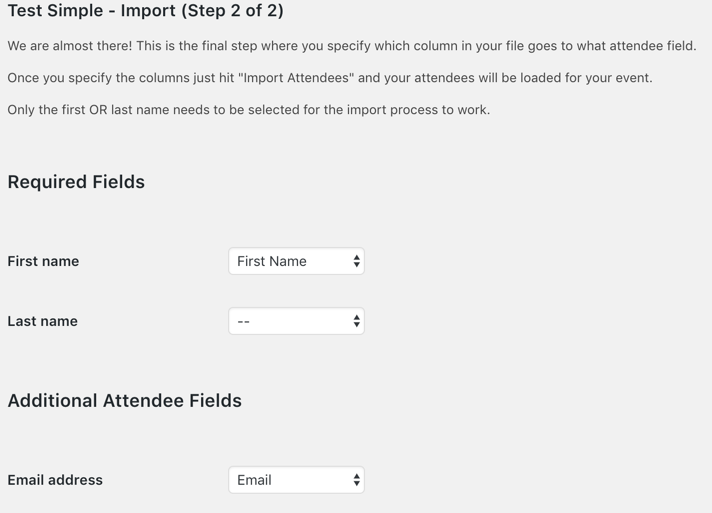
On this step, we map our import file’s columns to the attendee fields. In the above screenshot, there is a column with a label of “First Name” so we select that for the “First name” attendee field. We also have a field in the file called “Email” which we map to the “Email address” field. Each attendee field will have a drop down next to it that allows you to select which column in the import file to pull information from.
Once we have our file mapped, we are ready to import the data. Just click the “import attendees” button and your attendees will import. When it is done importing you will see a message like:
That is all you have to do to import the attendees for an event. Below is additional information on available attendee fields.
Fields Available for Import
There are many attendee fields that you can import. This area details all of the different fields.
Required Fields
There are two possible required fields, but only one has to be selected for an attendee to be imported. This means when importing you can specify the first and last name but if you don’t have that information you can also import with just the first OR last name.
- First name – The attendee’s first name.
- Last name – The attendee’s last name.
Additional Attendee Fields
- Email address – The email address for the attendee.
- Salutation – The salutation for the attendee. The only allowed values are the ones specified in the salutation event option.
- Suffix – The attendee’s suffix.
- RSVP status – The RSVP status for this attendee, valid values are: Yes, No, No Response, Maybe, and Waitlist.
- Associated attendees – This is a comma-separated set of names (first and last) that the attendee should be associated with for the event. When the attendee RSVPs they will have the chance to RSVP for the associated attendees. If a name doesn’t exist already in the associated attendees list, it will get created for the event.
- Passcode – A passcode the attendee should use to RSVP.
- Custom message – The custom welcome message the attendee will see when they RSVP.
- Number of guests allowed per attendee – The number of guests this attendee is allowed to bring to the event.
- Note – An internal note for this attendee.
- Primary attendee – If this attendee is the primary attendee. Valid values are Y or N. If this person is the primary attendee even if an associated attendee tries to RSVP it will show this person’s name at the top of who will be RSVP’ing.
- Group ID – A group ID that can be used to group people. This is useful if you have multiple groups that have attendees with the same names. Each group will be considered separate so two people but in different groups can be added to the event.
Custom Question Attendee Fields
For each custom question for an event, you will have the ability to specify two possible import file columns.
- Value for the custom question – This is the value that should be stored as an answer to the custom question.
- Access to the custom question – If the custom question has a permission level of “select people” then we have the option to map an import column to grant access to custom question. Acceptable values are Y or N. If no value is specified, then attendees will not have access to the custom question.
Access to Select Event Fields
If an event or sub-event has access defined as “select,” then there is the ability to select an import file column to grant access for the attendee to the event. Acceptable values are Y or N. If no value is specified, then attendees will not have access to the event.
Common Questions
How Does the Duplicate Check Work for Importing Existing Attendees?
During the import process, we attempt to avoid creating duplicate records. The process will check the existing attendee list to see if a first name, last name, and email OR passcode match with the current row trying to be imported. Also, if a group ID is specified, then that is used to limit further the scope of the check used to see if an attendee exists this is useful if you know that there will be multiple attendees with the same name if an attendee does exist then they will not be imported. However, the associated attendees and custom question-related columns will be imported/updated for that user.
If you have questions about this feature or have suggestions on how to improve it, please get in contact with us. We love to hear from you.