This article is going to discuss common ways you can modify the front-end of the plugin, including:
- Styling the front-end
- Debugging theme styles vs the styles set by the plugin
- Making text changes
- Changing form layouts
Preamble
This article is written with a person in mind who knows in general how to write CSS and do basic web development. Also, the examples below for debugging themes was based on Chrome similar tools exist in FireFox as well.
Styling the Front-End
The RSVP plugin only has minimal styling specified and inherits most of the styling from the theme being used on your site. The plugin does try its best to make sure that inputs should be displayed, delineates certain layouts for questions, and some padding. All of these requirements can be overridden by specifying the below styles:
- rsvpPlugin: ID of the main RSVP Container. Each RSVP step will be wrapped in this container.
- rsvpParagraph: Class name that is used for all paragraph tags on the front-end portion of the RSVP.
- rsvpFormField: Class for divs that surround a given form input, which is a combination of a label and at least one form input (could be multiple form inputs).
- rsvpAdditionalAttendee – Class for the div container that holds each additional RSVP attendee you are associated with.
- additionalRsvpContainer: The container that holds the plus sign that allows for people to add additional attendees.
- addProRsvp: Container that holds the additional attendee button.
- rsvpCustomGreeting: ID for the custom greeting div that shows up if that option is enabled.
- rsvpBorderTop: Class for setting a top border on certain divs in the main input form.
- rsvpCheckboxCustomQ: Class for the div that surrounds each custom question checkbox.
- rsvpClear: Class for div elements that sets the clear style to both. Currently used only next to rsvpCheckboxCustomQs as they are floated.
- rsvpRsvpQuestionArea: A class for the RSVP attending question.
- rsvpSubmit: A class for all form submit buttons
- rsvpMainRsvpQuestionContainer: A class that is used for a container div around the main RSVP question
- rsvpSubmitContainer: A class that is used for the container for the submit button
- rsvpButton: A class for all button elements in the RSVP form
- rsvpCustomQuestion: A class for all custom question container divs
- rsvpCustomQuestionShortAnswer: A class for the short answer custom question type
- rsvpCustomQuestionMultipleChoice: A class for the multiple choice custom question type
- rsvpCustomQuestionLongAnswer: A class for the long answer custom question type
- rsvpCustomQuestionDropdown: A class for the drop down custom question type
- rsvpCustomQuestionRadio: A class for the radio custom question type
- rsvpCustomQuestionReadonly: A class for the readonly custom question type
- rsvp_pro_attendee_list_container: A class for the attendee list container
- rsvp_attendeelist_search_container: An ID for the public attendee list search container
- rsvp_pro_attendee_list_export_button_container: An ID for the export button container
- rsvp_pro_attendee_list_summary: A class for the attendee list summary container(s)
- rsvp_pro_attendee_list_table_container: An ID for the container around the attendee list tabble
- rsvp_pro_attendee_list_table: The class for the attendee list table
- rsvp_pro_attendee_list_name: The class for the attendee name header and data elements on the public attendee list
- rsvp_pro_attendee_list_rsvp_status: The class for the attendee RSVP status header and data elements on the public attendee list
- rsvp_pro_attendee_list_associated: The class for the attendee associated attendees header and data elements on the public attendee list
- rsvp_pro_attendee_list_note: The class for the attendee note header and data elements on the public attendee list
- rsvpSubEventTitle – A class for the sub-event titles
- rsvpWizardEventTitle – A class for the event titles when using the “wizard” version
You can use these classes to modify the styling for anything we want inside of the RSVP form. There are two main ways to set a CSS style: the first way would be by adding styles to your theme’s stylesheet, the second is by going to RSVP Pro -> General settings and specifying custom styling there.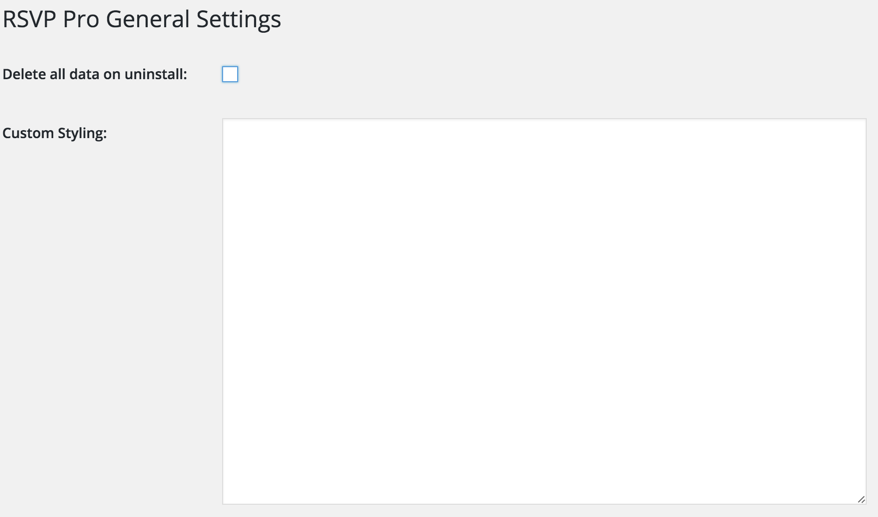
Once you enter in your styling, hit the save button and refresh the front-end, you will then see the styling changes.
Debugging Styling
Often times it can be tough to figure out why a part of the RSVP form (or really any part of your site) is looking the way it is. This section talks about some helpful ways to debug issues that arise. When using Chrome or Firefox, it is possible to find out the styles that impact a given element. The first thing to do is to go to the element of interest, right-click and select “Inspect.”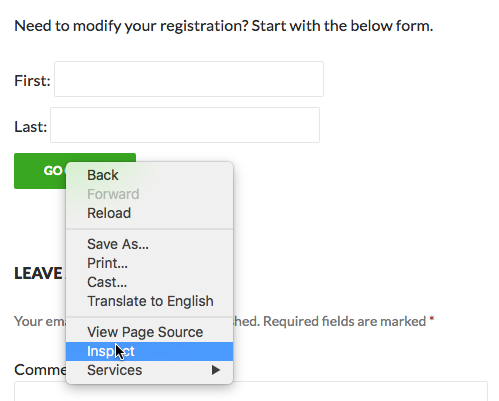
This will bring up a new display, which can show the style information for that element.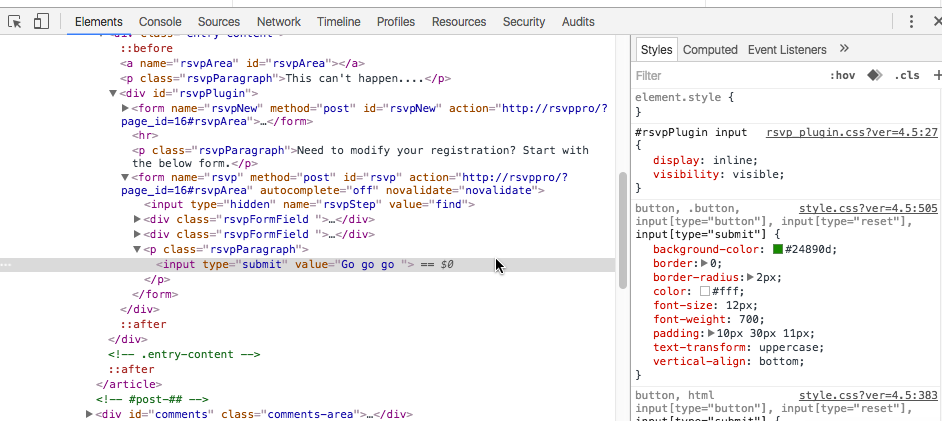
If necessary, you can modify the style at this point. Additionally, clicking on the “Computed” tab will show all of the styles for a given element. These views can be very useful because the style can be changed temporarily with the editor in the right hand column and you can see the changes immediately in the browser. If you want to get more familiar with these tools, the documentation can be found at:
https://developer.mozilla.org/en-US/docs/Tools/Page_Inspector/How_to/Examine_and_edit_CSS
https://developers.google.com/web/tools/chrome-devtools/iterate/inspect-styles/?hl=en
Changing Text on the Front-End
To modify all of the text on the front-end, go to the Settings area and click the “Front-End Text” tab. From here, all of the fields and elements can be changed. The default text is listed underneath each option to make it is easier to figure out which item you might want to change. The “Front-End Text” area has the following sub-sections:
- General – Contains text that is used throughout the attendee process items like “yes”, “no”, etc…
- Greeting Page –When RSVP’ing, this is the text that people first see.
- Edit Confirmation Page – Upon editing their RSVP, a confirmation page is shown to make sure people wish to make changes. This is the area to edit that text.
- Not Found Screen –When an attendee is not found, this verbiage is displayed.
- Main RSVP Page – This is the area for the text after an attendee is found during the RSVP process.
- One Step Per Event – When each event has a step in the RSVP process (explained below), this is where the relevant text changes are made.
- Confirmation Page – This is the area for text changes that will be displayed when an attendee finishes RSVP’ing.
Changing How the Forms Work
By default the RSVP Pro plugin has two steps for an attendee to RSVP:
- Looking up his/her name OR saying that he/she is a new registrant
- Answering all of the questions related to the event(s)
However, it is possible to change this by going to the Settings page for a primary event, selecting the “Front-End” tab, and then checking the “Frontend has one step per event” option. This will then make it so that during the RSVP process, each event has its own page. The upside to using this layout is that the form is shorter and easier to understand. If you have a lot of custom questions and/or many different events, switching to one step per event might be a way to make the experience better for your guests.
If you run into any problems with styling the RSVP plugin please feel free to reach out to us!